Doing a quick Google search, you’ll find there are lots of ways to paint plastic. Some processes were more involved than I was willing to try. Other processes were more expensive than I was willing to commit. When I did finally find a solution, I promised myself that I would share my results to others considering the same weekend project if the outcome didn’t disappoint. Turns out, the whole project was easier than expected and really only took a few hours on one weekend.
Below is my step-by-step log I put together in a very amateurish way as I did it by trial and error. I documented these steps for my own personal reference later. Please, do not consider this as official instructions in any way. Use these notes as you will at your own risk. You assume the risk of any and all consequences if you attempt to reproduce these results. Do not try this at home without willingness to personally and wholly accept the consequences if something goes wrong. Yes, you are likely violating the warranty. AS-IS. FOR EDUCATIONAL PURPOSES ONLY. NO WARRANTY EXPRESSED OR IMPLIED. ATTEMPT AT YOUR OWN RISK. There, now that’s been said and the lawyers should be happy. Please be careful.
NOTE: To reassemble the phone, carefully follow these instructions in reverse.

THE SPRAY PAINT I USED: I found great success with the Krylon Fusion for Plastics. “The no-prep, superbond paint.” “No sanding or priming, bonds to plastic, dries in 15 minutes or less.” Sold!
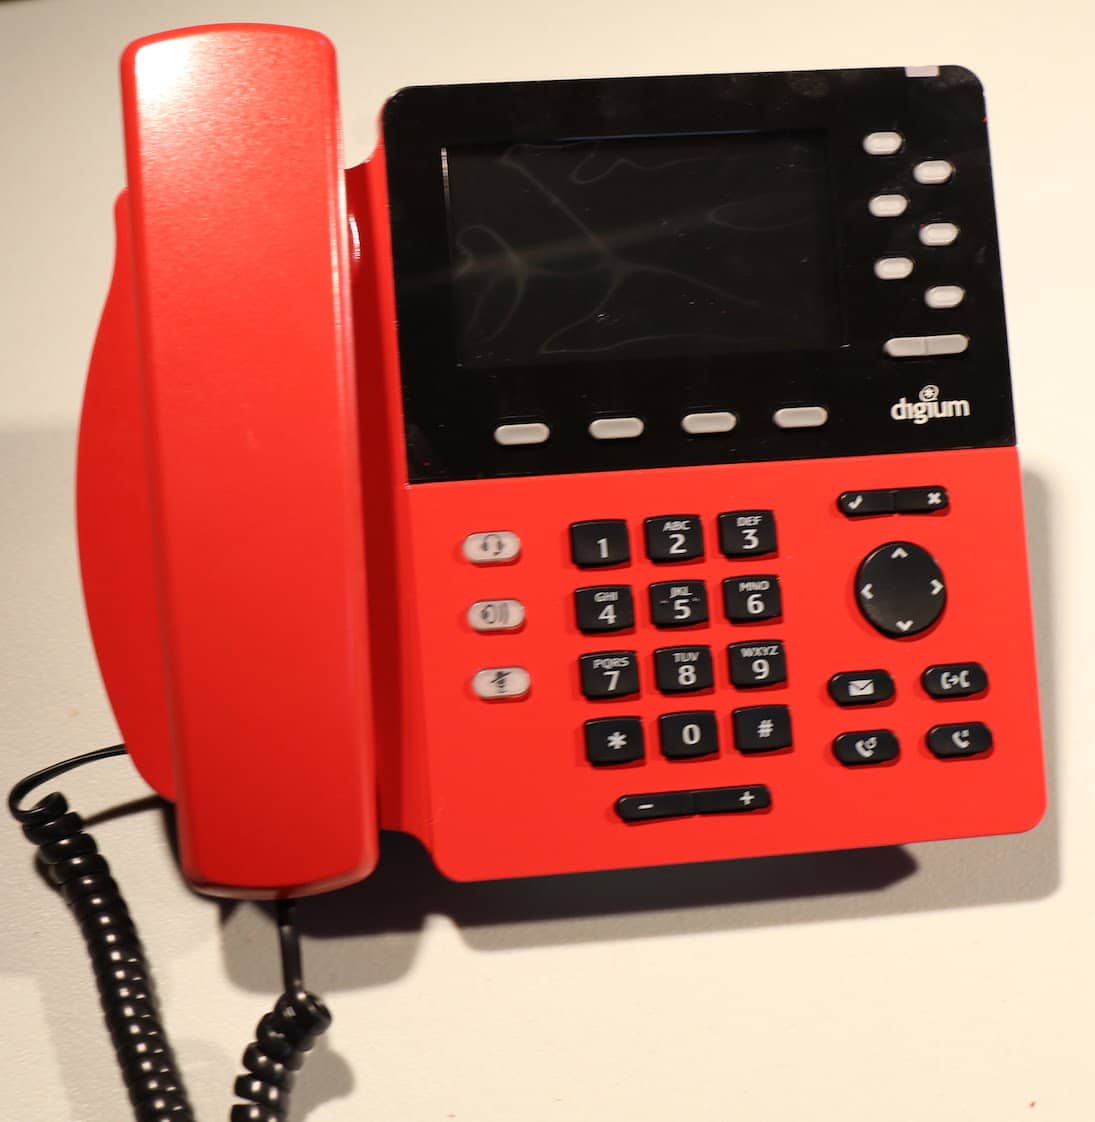
I selected color code Krylon K02328001 for Red Pepper in Gloss.
As you’ll read with this paint and about four really good applications of paint, I was done from disassembly to paint to reassembly in about 2-3 total hours. However, I did wait 72 hours before actual reassembly. (Although, the can recommends waiting about 7 days before reassembly to let the paint finish drying fully).
Yes, I did use the entire paint can for one phone, but YMMV (your mileage may vary).
Although I used the Digium D65, you could use a Digium D60. I’ve done this project already with a Digium D40 and it was just as easy with this new Digium phone series.
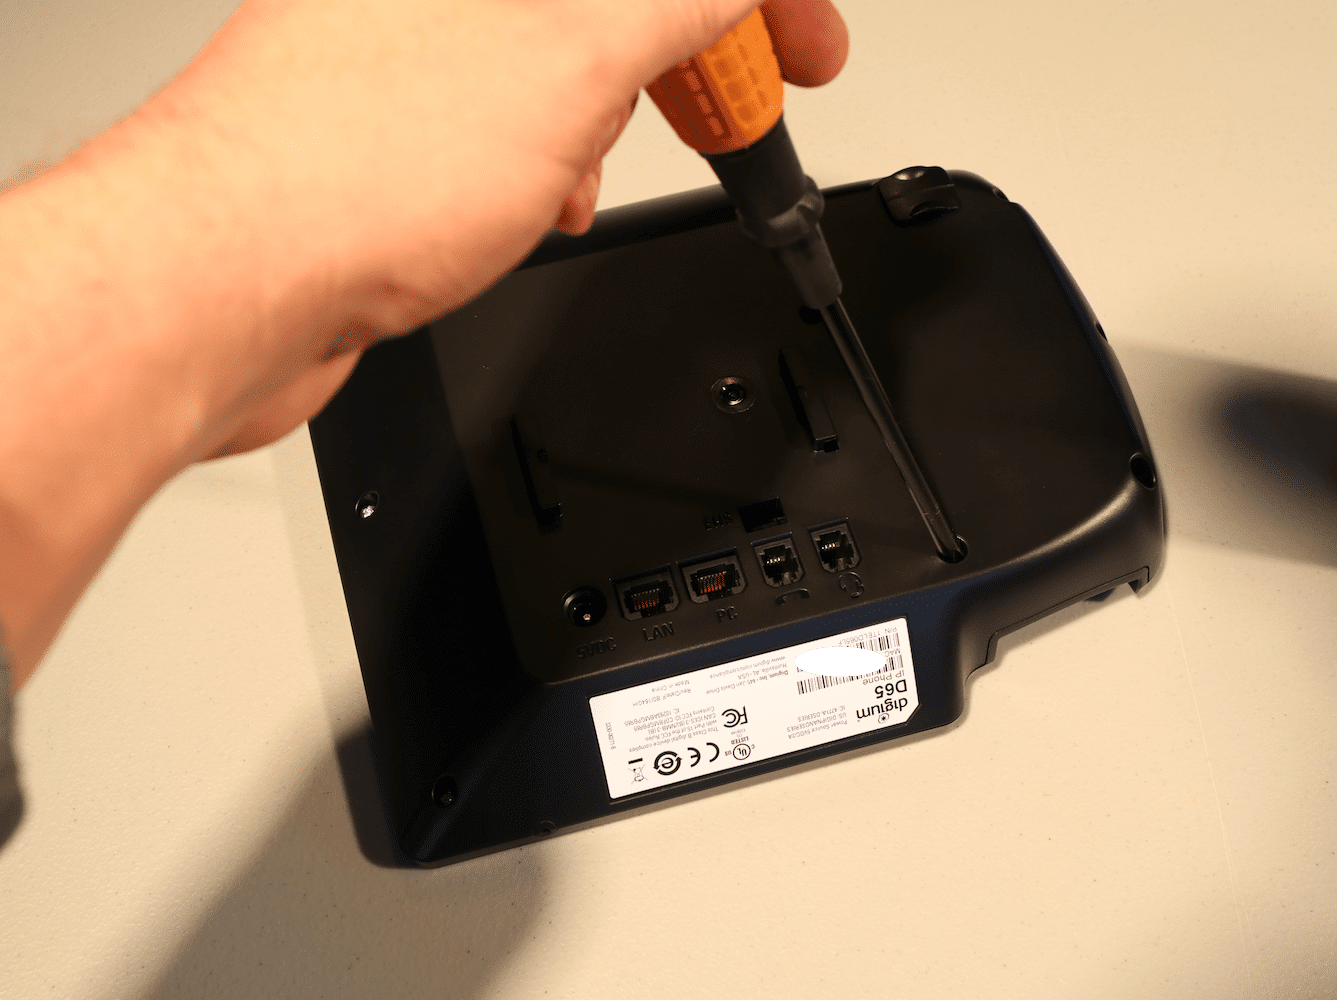
There are many Philips screws on the bottom of the case. Time to get started! Take them out and carefully set aside. (Find a bowl or dish to keep all the screws. There will be a lot of screws total! p.s. The screws inside the phone are different than the screws outside the phone, so be sure to keep them separated.)
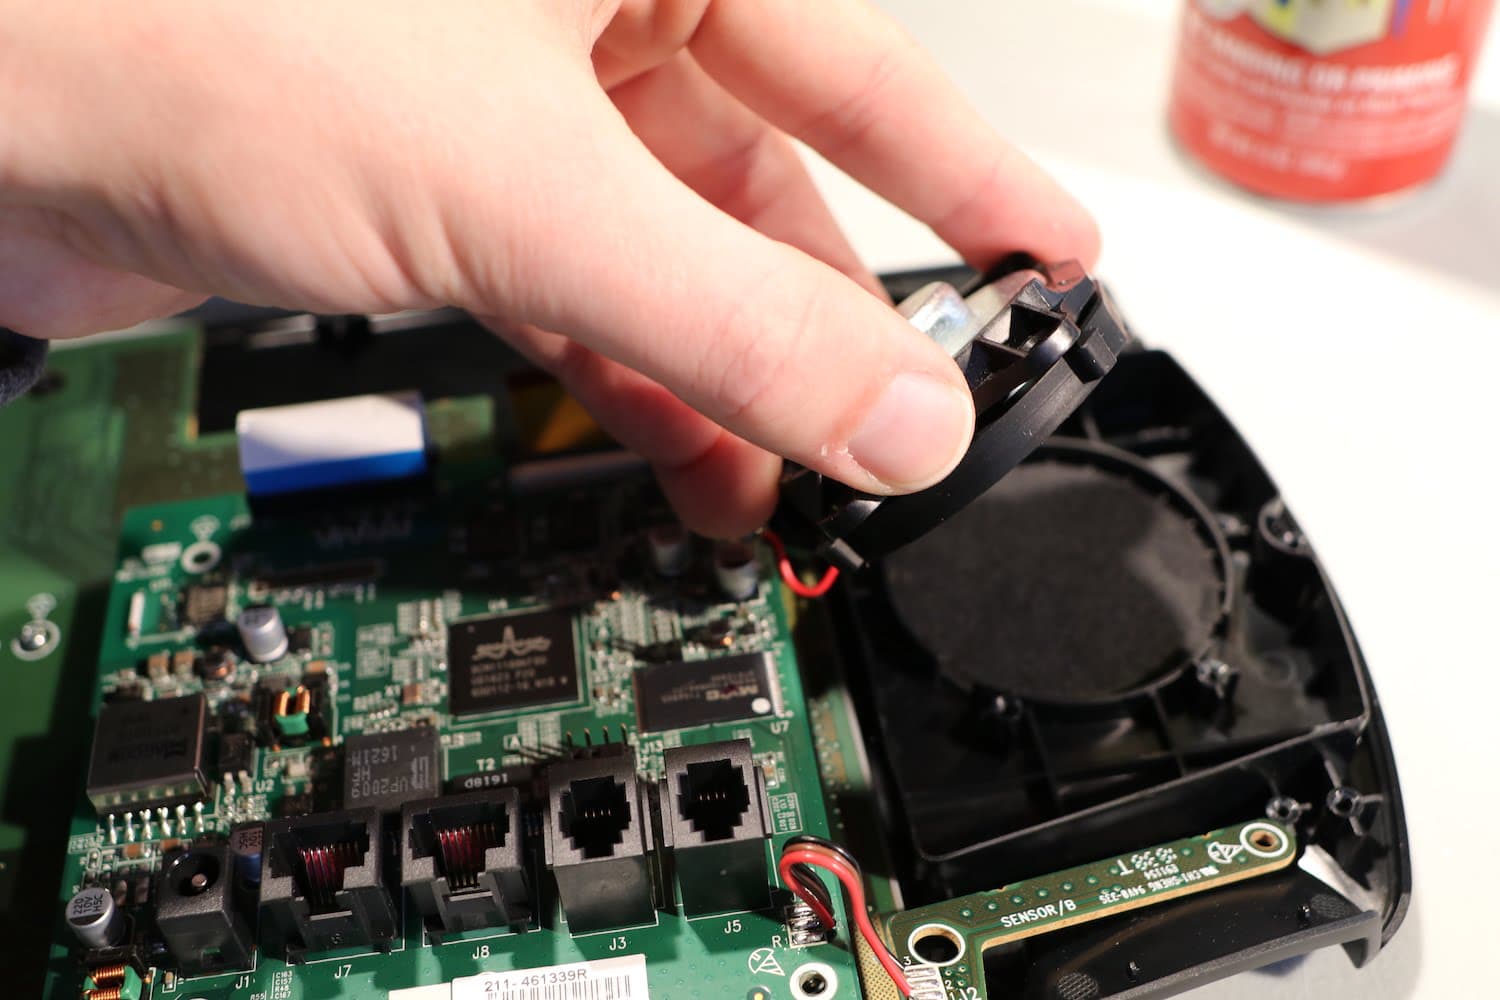
Inside the D6x series Digium phones, you’ll immediately notice two large circuit boards in the middle, a microphone on the left, a speaker and magnetic hangup sensor on the right, and a display screen assembly.
First, the little board on the right is the magnetic sensor for detecting when you lift or hangup the phone’s receiver. It has one screw and pulls up and off a plastic peg. On the bottom left, you see the motherboard also has a permanently wired microphone surrounded in a thick rubber ring. Slide up and out the microphone from the plastic case.
Next, you have a ribbon cable on the top left of the motherboard that connects to the daughterboard below it. CAREFULLY remove this ribbon cable by CAREFULLY pulling it up out of its tight connector. It doesn’t matter if you remove this ribbon cable from the connector on the motherboard or from the connector on the daughterboard, really.
Also, there is a VERY DELICATE and VERY THIN ribbon cable at the top right that connects the motherboard to the display. See those tiny white push pins on the left and right side of the connector? You’ll need to carefully push each of those side white pins up to “release” the ribbon cable. (When you put this all back together, you’ll line up the ribbon cable and then push the pins to “tighten” the connection back in.)
Lastly, remove the screws holding in the speaker, set aside the rubber seal, and remove the cloth speaker cover.


The daughterboard is really just the “keyboard” for all the buttons on the front of the phone.
Unscrew these and remove the daughterboard and its rubber contact layer underneath.
All of the buttons simply sit in the case. Some buttons are grouped together, so make sure you lift them together!
Lift all of the button “sets” up and out of the front case then set aside.

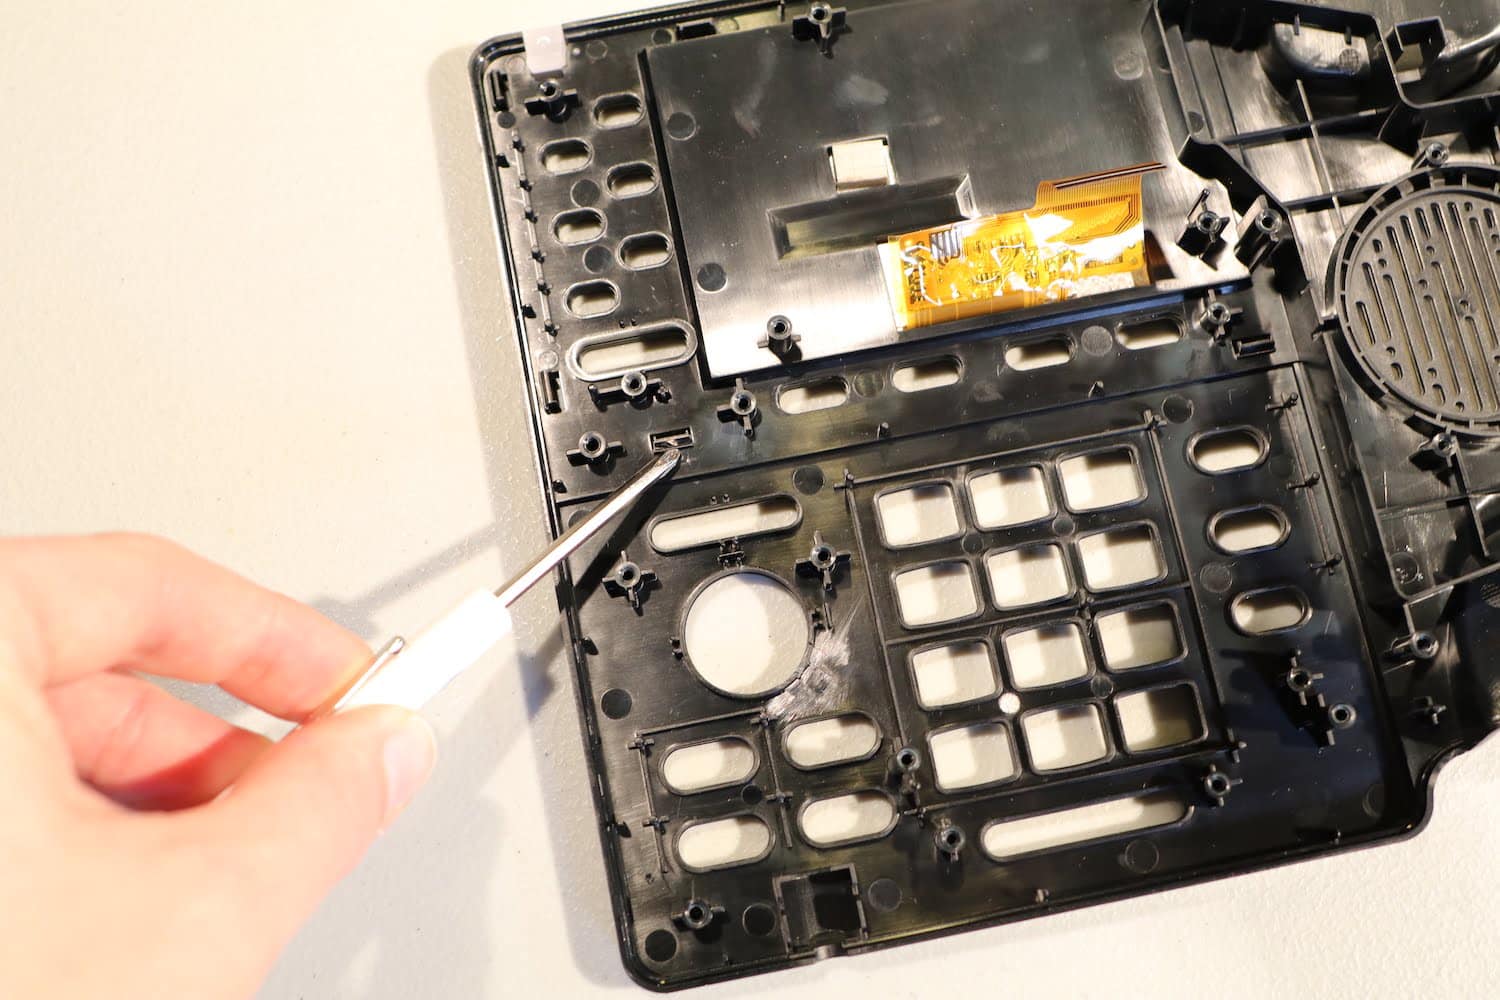
The color display screen “rests” inside the high gloss black plastic that comprises the top half of the front of the phone. That high gloss black plastic is snapped into the main front plastic by four clips/tabs.
Using a small screwdriver, push up slightly on each of those four clips/tabs from the back of the assembly to help push out and remove that gloss black plastic from the dull black plastic.
BE VERY CAREFUL to not let the color display screen fall out, because it will want to fall out!
Turn the plastic assembly around to continue separating the glossy from the dull. Don’t get rushed on this step! Take a break and a deep breath.
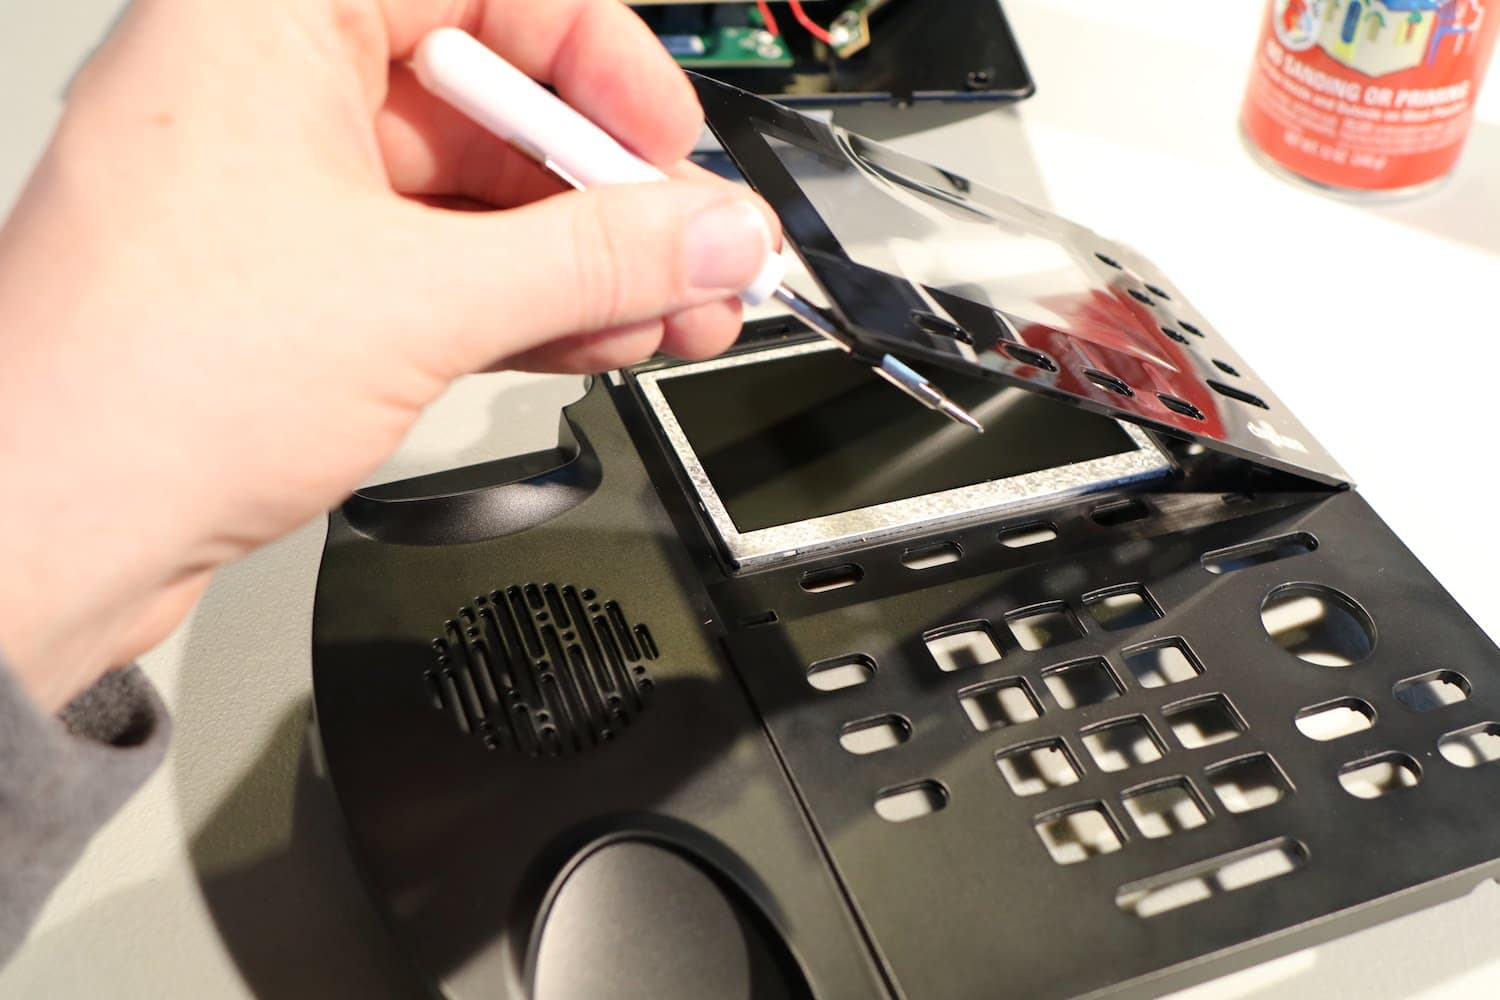
Carefully lift and remove the color display screen and backlight assembly. Remember, there is a very thin and delicate ribbon cable that will need to be guided through the plastic as you lift and remove the color display screen so lift it slowly. No scratches! Set aside gently.


Using your finger, press out the message waiting indicator reflector and set it aside.
Don’t forget this tiny piece. You don’t want to get paint on it and you don’t want to lose it!
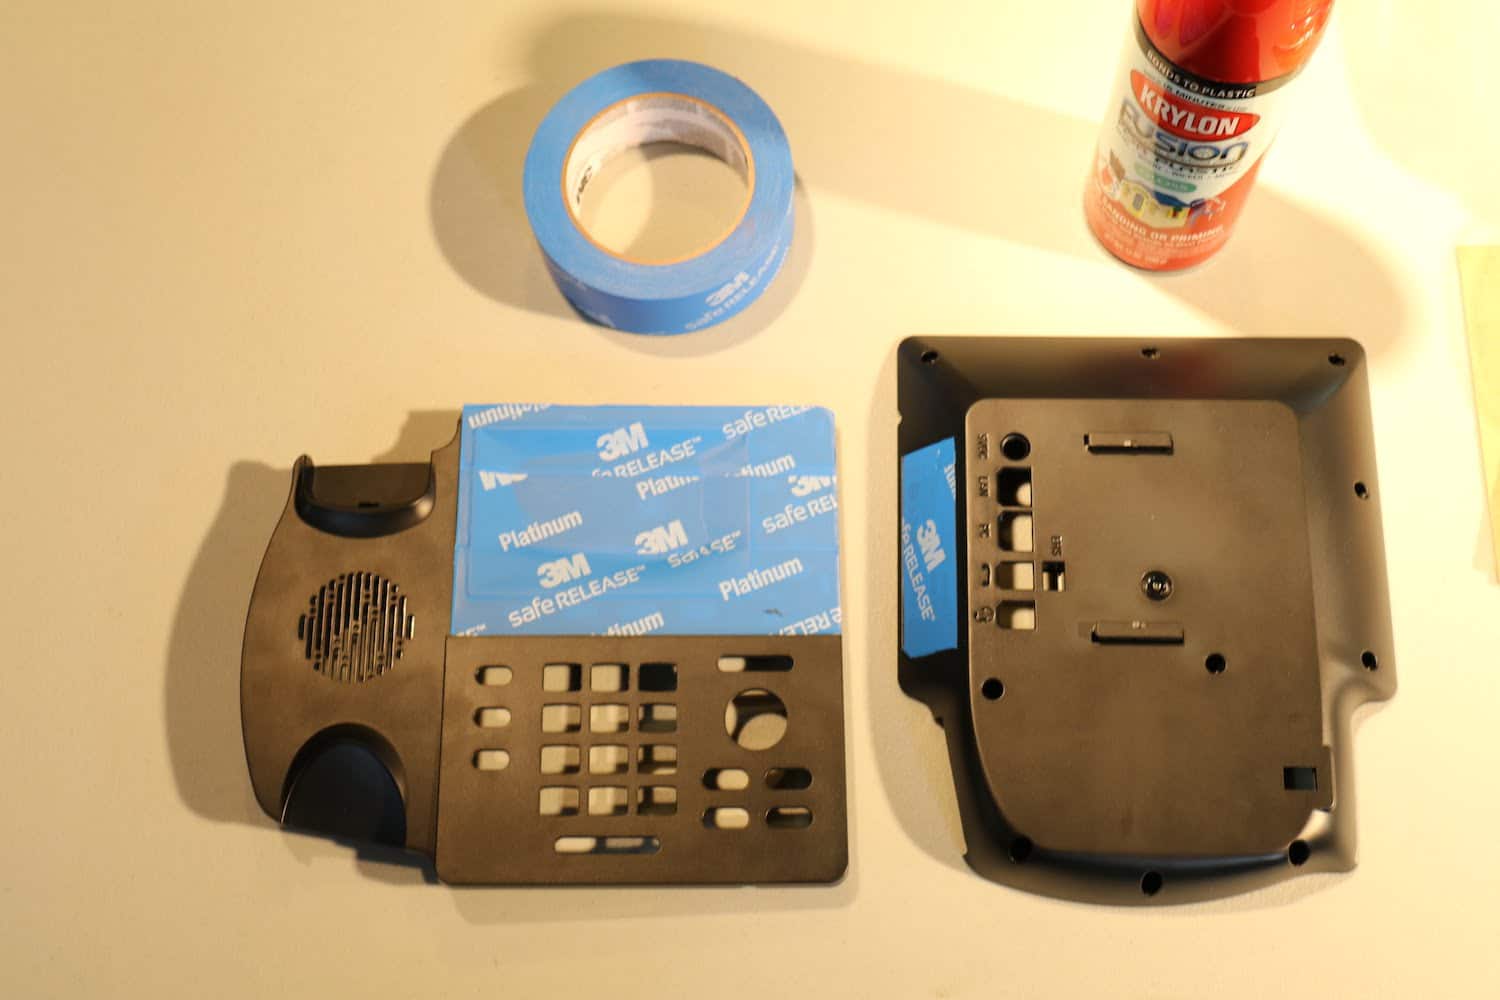
If you’ve followed all of the steps correctly, this is what should be left of the front assembly and this is what you’ll be taping and painting.
Wipe it all down aggressively with water and then a dry cloth. Don’t use any chemical cleaners.


The only piece you’ll need to remove from the back assembly is the desk/wall receiver hook mount. Get that small piece out now and set aside because if you don’t, the paint will act as a glue and it’ll be almost impossible to get that piece out again after the paint dries.
Use some premium painters tape. I used 3M Platinum Safe Release. Cover the MAC address label on the back assembly and then use a razor knife to trim around it as perfectly as possible.
Cover the front top of the front assembly where the high gloss black assembly once was located, but be careful not to tape over the top edge and side edge as those parts of the front assembly will be visible after display reassembly so be certain you can still get your spray paint to cover the top edge and side edge. I used a razor knife to trim the painters tape around the top edge and side edge of the top half of the front assembly just to be sure I would get paint coverage on that thin strip of plastic edge.
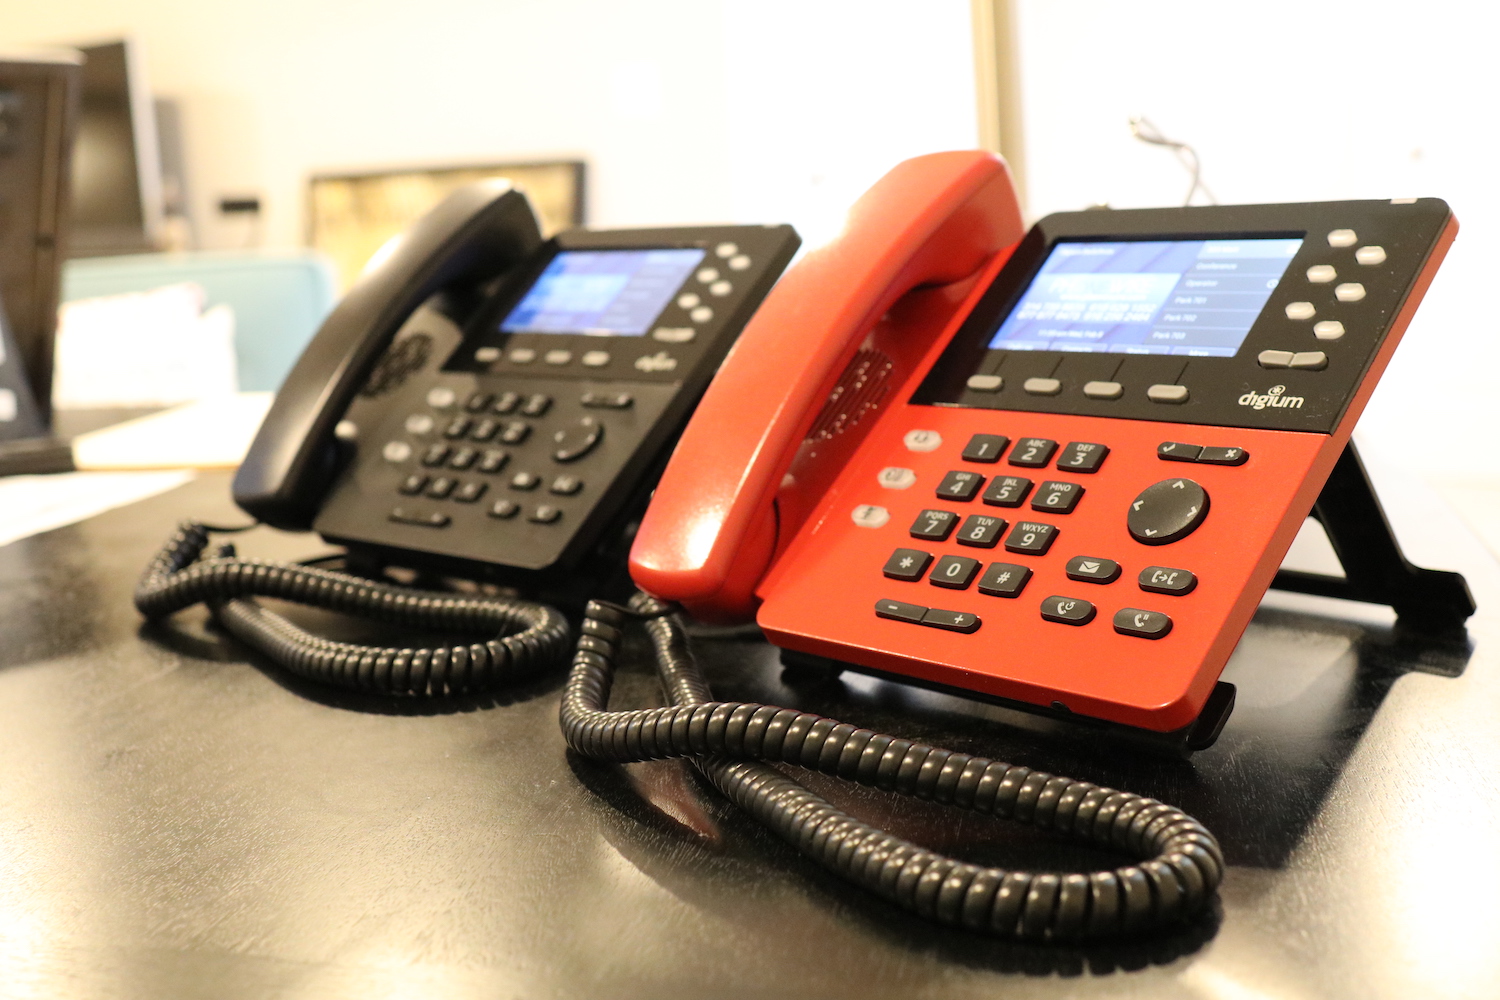
Lastly, I placed a piece of tape on each to cover and protect the microphone and speaker of the telephone handset. I suppose you could disassemble the handset and remove all the components, but I decided to simply avoid that extra step. And, I don’t mind the two-tone black/red look of the finished result at all. In fact, you could leave the handset in its original black and I still think the finished result would look great!

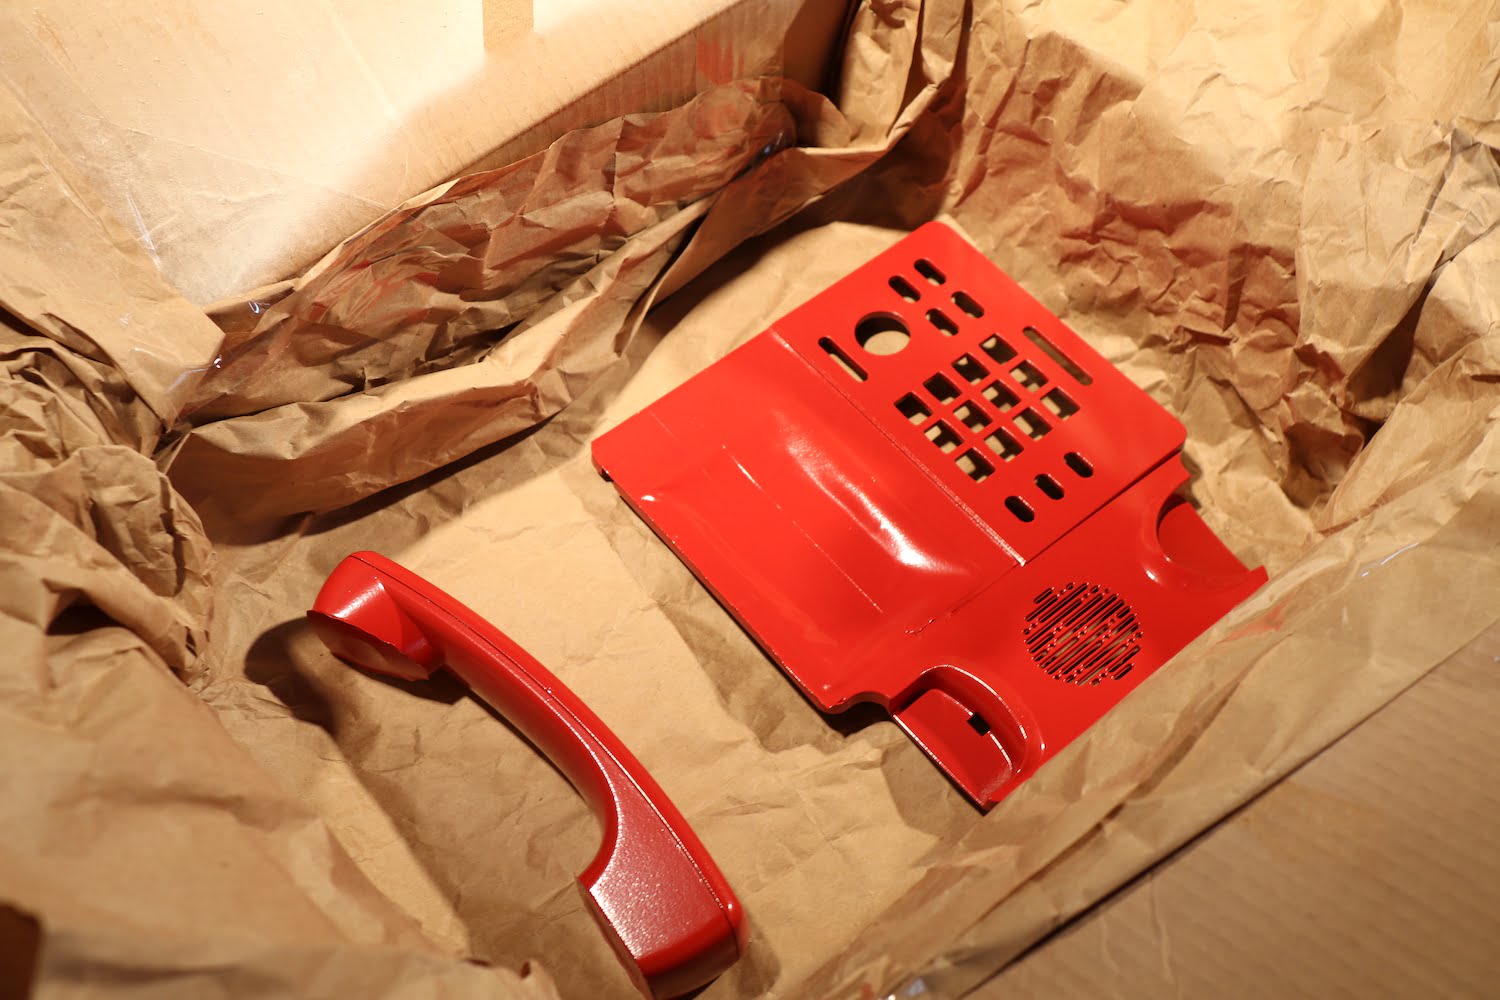
I grabbed an old cardboard box and took it outside to spray the pieces together. The paint can recommends a smooth, moderately slow back-and-forth, top-to-bottom method. You will likely need to paint once, wait 15 minutes for it to dry, then paint again, and repeat to desired result. For best coverage, each spray session I moved the pieces around a bit for different spray angles before I sprayed the paint.
It took me four paint cycles (about an hour) to get a really nice coat on everything and be sure every corner and edge were covered well. If you go too fast, you’re in a hurry, you get that spray can too close, or put on the paint too thick in one pass — you’ll mess it all up… and you don’t want to mess it up! Go slow and do it well.
Remember all those screws? Yep, time to put it all back together and test it out.
So worth the effort, though! The project only took a few hours and I’ve gotten faster after my first attempt.
I now own a very original red Digium D65 phone and all bragging rights that go with it. It’s a quick weekend project and it absolutely looks like I custom ordered it direct from Digium themselves. Love it!
So, what color paint would you choose?